Fishing Trolley, 7 Easy Steps to Make Your Own
TL;DR
- A fishing trolley makes land-based fishing easier when carrying rods, tackle, bait, food, lights or a chair.
- It is especially useful for long walks, piers, riverbanks, beaches, mobility limits or breathing issues.
- The basic build uses a folding hand trolley, cooler, rod holder, bolts and secure attachment points.
- A cooler adds storage and can double as a seat if it is strong enough.
- Pneumatic or sand wheels make the trolley quieter and easier to pull over rough ground.
- Build it around your own fishing style; rod holders, lighting, power and tie-downs can all be added later.
Updated June 2026
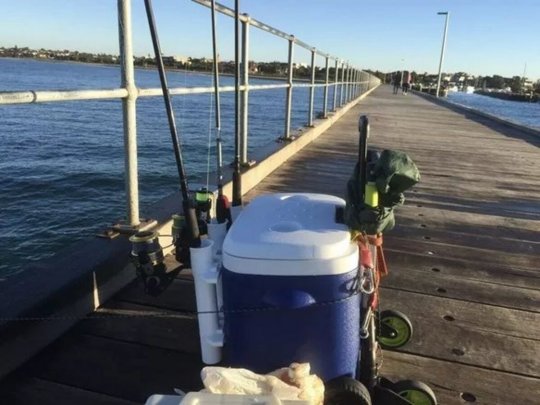
I began making a fishing trolley in 2018 because I needed a better way to carry my gear. In this article, I’ll walk you through how I built mine.
When my asthma got worse, I put together a fishing trolley (sometimes called a fishing cart) to help me carry everything when I go fishing.
In December 2020, I had a serious leg injury that needed four surgeries and a skin graft. I still use a walking stick, so the fishing cart is now essential whenever I fish from land.
This is the third version of my trolley, and I’ve updated this article to show what’s changed.
Over time, I’ve made a lot of changes that have made the fishing trolley much better.
Using my trolley in different places, I found that some features were missing, some weren’t needed, and others could be improved.
Since I first wrote this article, I’ve also changed cars—from the Falcon to a Ford Territory, and now to an Everest. So, space is less of a problem for me now. I’ll write a separate article about the different trolley setups I’ve tried and what I’m currently using (which is actually two different trolleys or carts).
Table Of Contents
Who May Find A Fishing Trolley Useful?
- For people who are disabled, elderly or have breathing conditions.
- The ability to carry bulky equipment like rods, tackle box, cooler (aka “Eski”) easily.
- Carrying gear over a long distance.
- Something to sit on while soaking bait.
- Somewhere to store bait, drinks and lunch for long sessions on a pier or riverbank.
- Anybody who tends to carry more heavy or complex gear than they can easily manage. This step-by-step guide shows how I built my own fishing trolley. You can follow it or use it as inspiration for your own design.
Even though this article is about building a fishing trolley, it’s still a good idea not to bring too much gear.
I’ve borrowed ideas from other fishing carts I’ve seen on piers and beaches, watched videos online, and checked out commercial options too.
My latest fishing trolley design lets me take off the new pneumatic wheels and swap them for large, wide sand wheels when I go beach or surf fishing.
The total time includes drilling and mounting the hardware. Although I built this over time, each step only took about ten minutes.
Remember to measure twice and drill once.
Steps To Build Your Fishing Trolley AKA Fishing Cart
Steps To Build Your Fishing Trolley AKA Fishing Cart
Estimated Time 1 hour
1. Folding Aluminium Hand Trolley
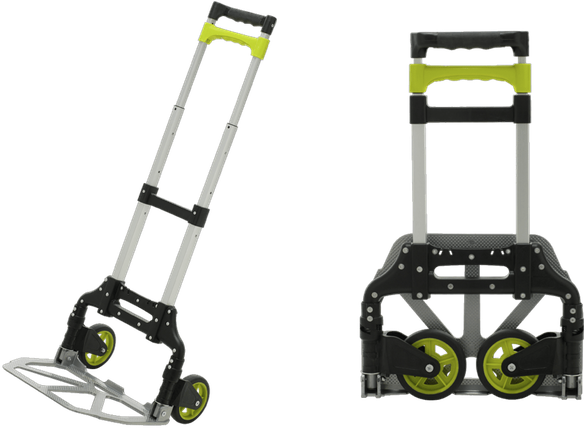
For my own, I chose the TopLift 70kg model from Bunnings.
I wanted the fishing trolley to have a good base plate, durable wheels, and a medium lift for the price. These units fold completely flat into my Ford Falcon’s boot. But it’s flat enough and folds small enough to fit into my wife’s Hyundai hatch.
So it’s a good choice to base a fishing cart upon, even if you have a much smaller car.
Since upgrading from the Falcon to a Ford Territory, this has been much less of a concern to me. However, space is always at a premium, especially if staying overnight!
The wheels are reasonably quiet and robust. A lot quieter and stronger than the wheels that come pre-mounted on some coolers. So they’re harder to damage and don’t make heaps of noise when you pull them.
Other folks fishing on the pier will thank you for that!
Note that I still found these wheels to be noisier than I’d like. So, in the latest build, as detailed below, I replaced them with removable pneumatic wheels that can also be swapped for sand wheels, should I choose to do so.
Pneumatic wheels (inflatable) are quieter, depending on how much air you use. You can select a trolley with those if you wish. I didn’t at the time, and as already stated, added them myself, along with a second axle. Leaving the existing ones in place (handy when climbing steps, as they actually function the same way as stair climbers – a happy accident)
Even with a full load in the cooler, I still find it easy to lift the fishing trolley over obstacles when I need to. So it’s extremely lightweight.
I don’t use this on the ocean beaches and dunes in this configuration. I have picked up some beach wheels that I use by removing the pneumatic wheels and popping them on as needed.
These are all optional. If you’re happy with the slightly noisier solid wheels that come with the trolley, then there’s no need to change – and you’ll have less to do in the build process!!
Keep in mind that, like all smaller wheeled trolleys, it’s going to get caught in the sand. But on piers, river banks and smaller beaches, it works a treat.
I have removed the wheels on the cooler because they eventually wear out and disintegrate with regular use.
As you can see, a DIY fishing trolley is very much a process of working out the kinks!
2. Cooler With Handle, Wheels & Lid
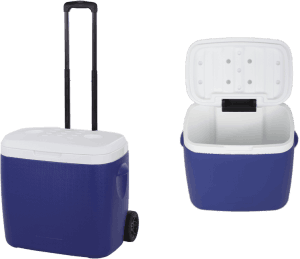
Hang on? Wheels? Haven’t we already got a trolley?
Yup. But having the wheels on the cooler as well means I can still pull it in places where the stainless steel trolley won’t work. Like beach fishing.
The wheels on this model will last many years. However, they eventually began to perish (after three years in the salt), so I removed mine and kept the cooler. I added pneumatic wheels instead.
However, these worked well, and it took a lot of use before they became a problem. So they are still a valid option!
The wheels on the model I chose from Kmart are fairly robust and don’t interfere with being mounted on the trolley. This increases the variety of environments we can put our fishing trolley to use.
It should be noted, though, that the wheels on most coolers are not strong enough for long-term use. This is why the aluminium hand trolley was selected.
I tested the “cooler with wheels” without the aluminium hand trolley, and it quickly became clear that the wheels on the cooler are only a backup. Great for some beach use. Otherwise, they are noisier, weaker, and won’t last on their own.
Bonus – if you’re around 100kg or less, the cooler makes a useful seat while fishing. It seems to tolerate my previous 107kg (I lost over 20kg, happy to say) quite well. So the 100kg is arbitrary.
However, you have a fishing trolley, right? Yup. So carrying a comfy deckchair with arms is a no-brainer!
That’s why I always carry spare bungee cords in the cooler on my fishing trolley. It makes it easy to attach things as needed for transporting.
3. Rod Rack – Easy Carry & Easy Fishing
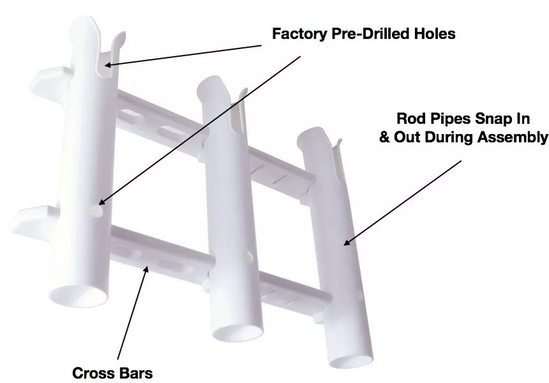
Some folks use PVC piping – which is awesome for the task.
However, for this project, I opted for a factory-made Rod Holder System with Knife & Pliers Storage because I wanted a “finished look,” and it came with great “extras.” For example, knife and pliers storage.
The one I chose is all plastic and made for boating by Jarvis Walker. It holds three rods, two knives and two pliers (or substitute other tools as needed)
It’s quite sturdy as it’s back-braced. It’s fast to assemble as it’s pre-drilled. It does come with mounting nuts and bolts. However, I found them a tad short for passing through the front panel of the cooler. So I substituted those.
This is one of those features on a fishing cart that really improves usability. Very few jetties and piers in Victoria, Australia, have nice little supports for fishing rods.
Having your own rod holders on a fishing cart means your rods are secure.
They look cool, too!
4. Fishing Trolley Rod Holder In Use
In use, the rods are placed in their folded-down state (halves, etc.) with reels attached. If they are fully assembled when pulling, you’re likely to get a continuous thwack in the head from the rods.
Reels fit into the slots on each “pipe.” This gives them some free movement of the bail, when needed, while seated in place. It keeps most rods from touching the ground. The slits for the reels are nicely rolled smoothly to avoid friction.
When fishing, they sit inside, just as intended, as they would onboard a boat. No more leaning against pier rails or on the ground!
5. Drilling Your Mounting Holes In The Cooler
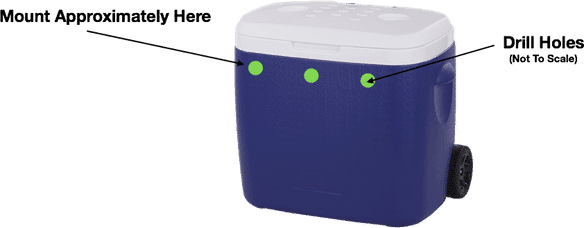
With a small drill bit in your drill. Gently drill a hole in the top crossbar – the starter hole is already done in the factory – into the cooler. Repeat with the bottom hole, ensuring the bars are level with the cooler.
Remove the rod rack from its position. Use a wider drill bit to enlarge the holes to the circumference of your bolts. Clear away any excess plastic and pieces from the holes as you go.
To test your holes and position: Place the rod rack back in position and insert your bolts, with the nuts on the inside of the cooler. Finger tighten, not tight. Top and bottom bar. Don’t worry about the bolt overhang as we’ll trim it down to size with the hacksaw later.
6. Check Bolts On Rod Holder
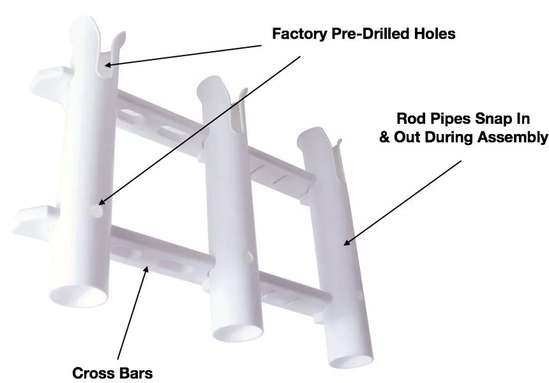
Place the centre rod tube.
Reinsert the bolts through the factory-drilled holes in the tubes.
Check that they match up on the pipes and the back bars.
Finger-tighten the nuts.
Remove the bolts.
In the next step, we will finish drilling the holes for the bolts of our fishing trolley rod holder.
7. Completing Drilling & Assembly Of Rod Rack Onto Our Fishing Trolley
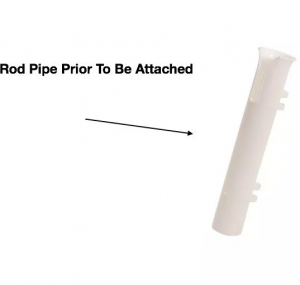
Now, you can drill the starter holes for the left and right outer pipes and their top and bottom crossbar positions. To do this, remove one of the side pipes. Left or right.
Make sure the rack is level. Repeat the drilling process above for the top and bottom crossbars.
Once drilled, replace the removed pipe into its slots on the crossbars. Insert bolts and finger-tighten. Repeat the whole process with the pipe on the other side, depending on whether you removed the left or right pipe.
Tighten the nuts gently. You could optionally place rubber washers under each at this point to protect the cooler plastic. Also, a touch of Loctite spray is better than over-tightening the nuts.
8. Our Stainless Steel Trolley Attachment Points On Our Cooler
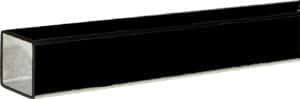
In a recent update of this fishing trolley project, I’ve replaced the eye hooks (described in 6b below) with a steel square tube, bolts, nuts and wing-nuts.
The advantage is the strength and speed of assembly. It also looks neater and nicer with the square tube.
I found the flat straps would move on some surfaces, making the trolley a bit harder to pull at times. This fixes that. One steel tube stabilises 10 times better than the straps.
These can be bought from most hardware stores. I picked mine up from Bunnings. You can buy these in lengths at some places, such as where I bought mine, precut to around a metre (3 feet). This required only minimal trimming with a hacksaw once fitted.
Heavier steel will require something like an angle grinder to cut.
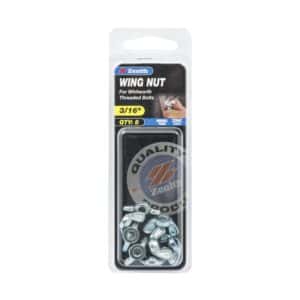
I chose 3/16″ Bolts, nuts, and matching wing nuts.
Because the lower eye-hooks were kept at the bottom of the trolley (as described below), they became useful for using as peg holders.
A trolley like this can get a little top-heavy with rods in. So jamming tent pegs (or other spikes) into the pier between the planks, or into the ground on land, helps keep it from tipping.
The instructions below for the flat-strap version of this trolley contain the correct details regarding drilling, etc. Just substitute the upper two eye hooks and flat straps with the steel square tube, nuts, bolts, and wing nuts.
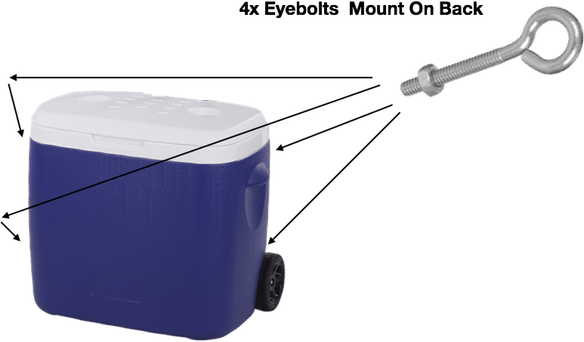
Bonus – the eye-hook bolts we use also make a great anchor point for passing a couple of hefty tent pegs through if you’ve got your fishing trolley cooler on the beach.
Old Version – Using Flat Straps Instead Of Aluminum Bar (No Longer My Preferred Method)
Most importantly, if using this method, choose flat straps with carabiners, rather than traditional octopus straps with hooks. They are sturdier and less prone to flying off by accident.
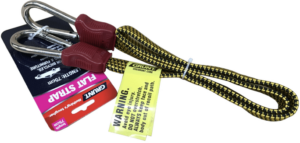
However, like its octopus strap cousin, if you let go of a fully stretched strap, it springs back hard. Watch your eyes and watch your knuckles when connecting and disconnecting!
So here’s how we attach it firmly and securely so our cooler – and its contents – don’t fall off. Whether we’re pulling it up a pier or path, or while we’re fishing.
First off, drill a hole in the top of the cooler at the left edge with a drill bit that matches the diameter of your eye-bolt shaft.
Repeat this along the top-right edge, making sure the holes are level.
It’s smart to drill a centimetre or two below the lid, taking into account any handles, hinges, etc., already on the cooler.
Repeat the above at the bottom of the cooler. Taking the same spacing considerations into account.
Insert your eye-bolts.
Cut down the eye-bolt bolts as necessary within the cooler. Make them level with the nuts. Once again, this will help you reduce catching your hand or arm on the steel.
9. Our DIY Fishing Trolley With Cooler & Rod Holder Is Complete!
Now, all you need to do is place the cooler onto the base plate of your foldout stainless steel trolley. Hook up your flat straps – wind them around the extended handle a few times to get the desired tension, then clip the buckles at each end onto your eye hooks.
Test it out. Put some rods into the holders.
Fill it with some tackle. Move it about. Test the rod holders with your rods fully extended.
Then start planning your next comfortable fishing trip with your new fishing trolley/fishing cart (depending on what part of the world you’re from).
BTW – if you’re under 100kg – depending on the cooler you choose, it can make a comfy place to park your backside between casts.
As I weigh in at a fraction over this, I strap a fold-up camping chair to the handle. It sits just on the lid while pulling the trolley. It is pretty comfortable, and the fishing trolley isn’t any harder to pull with a chair strapped to it.
Estimated Cost: 70 AUD
Supply:
- Folding Aluminium Hand Trolley x 1 (Recommended – Bunnings for the great Toplift brand)
- Cooler. 38 litres x 1. You can use one with its own handle and wheels, but it’s optional.
- Rod Holder System With Knife & Pliers Storage
- Nuts and Cup-head bolts. Pack of 12. Best to get stainless steel or Galvanised Eye hook bolts x 4. (Make sure the eyes can accept the flat-strap hooks below.)
- Flat-straps (octopus straps) with carabiner style buckles. You’ll need at least 3 of these.
- OR – In an update, described below, I’ve replaced the flat-straps with a steel square tube, nuts, bolts and wing-nuts.
- I’ve added pneumatic wheels for quietness on piers & gravel paths. This is cool, but optional
- Some tubular aluminium for an axle and front supports if using the pneumatic wheels.
- Some sundry nuts, bolts and split pins as needed for your build.
Tools:
- Small drill/driver. One of the little two-speed rechargeable battery drills is perfect.
- Pack of drill bits. You’ll be using small bits to get started, and larger bits to expand holes as needed. So a variety of sizes is great.
- A hacksaw. This is to trim down our custom bolt sizes, aluminium supports and/or axle. You’ll appreciate not stabbing your hand reaching in when you’re using your trolley while fishing.
- NB: A Dremel and/or a Multi-Tool are easier, more versatile to use, but optional.
- Spanners to hold nuts while you tighten them.
- Some clamps or a vice to hold things while drilling and cutting. Optional – but very handy.
- Your imagination and your own permission to use it. This is yours. It’s custom. Make it do what you want.
Fishing Trolley Update 2021
As I mentioned earlier, I managed to do myself a mischief. Damaging my leg. That meant walking with rods, a tackle box, and a chair has become well-nigh impossible.
So I updated and modified the fishing trolley in May 2021.
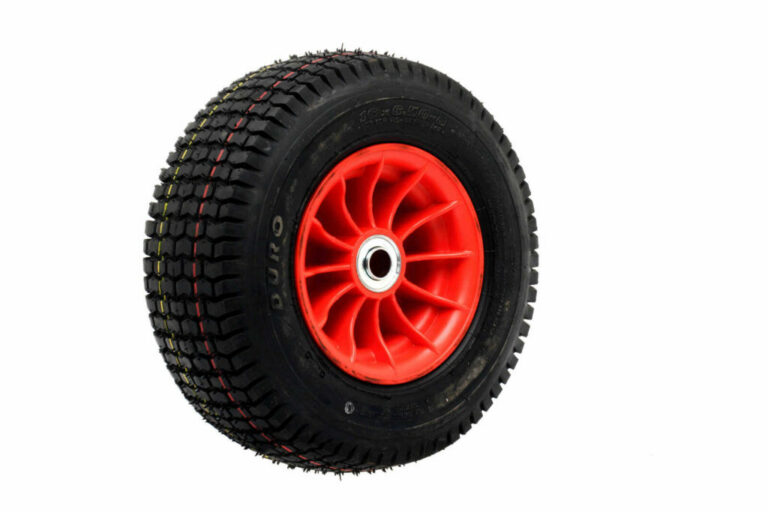
First up, I’ve added pneumatic wheels.
You can buy these for under $ 30 per pair at most hardware stores.
I made an axle from a piece of tubular aluminium I had lying around. Just cut it to size. Then clamped that on the trolley base plate with U-Bolts.
The pneumatic wheels clamp on with a ring pin arrangement. A split pin will work perfectly, too.
Of course, this then meant that the fishing trolley was no longer balanced when at rest!
So I also made an arched foot using another piece of tubular aluminium. The piece I used was from an old mirror I found on the side of the road. But you could bend your own easily using a vice.
The result was a huge improvement. Easier to pull. A lot quieter. Works nicer over stones.
I removed the wheels from the cooler, as they were no longer needed.
Finally, since the cooler has been used so much and was starting to look a little worse for wear, I painted it. Just used a flat black enamel spray after sanding it lightly to help the paint adhere.
The enamel spray paint includes a primer. So no additional prep was needed.
This final touch really made the whole fishing trolley look finished.
Yeah. The paint will chip and scratch over time. But then the spray enamel costs less than $10 a can. So a touch-up spray isn’t a problem.
I also took one of those cheap LED head torches you see at big-box tackle stores for under $10 and attached it to the underside of the cooler lid. Those cheap torches aren’t powerful enough for their intended use. However, on the fishing trolley, this lets me light the cooler’s interior.
My final addition to the fishing trolley, at the time of writing, is an aluminium telescopic post to mount an LED floodlight. This makes it easier to see the area around the trolley, such as when I’m tying leaders or de-hooking fish.
The telescopic pole also has a mount for my GoPro.
Another add-on to come is some wiring and a plug. I have a 12V AGM battery inside the cooler, which is mounted on the fishing trolley. I use this to charge my phone and GoPro.
I’m adding a plug to accommodate some additional electronic fishing kit, which I’ll write a bit more about here when it’s finished.
Oh, and if you’ve read this far and you’re building your own fishing trolley (or fishing cart), I’d love to hear how your build turns out!
Share this post

Written by
Scott Kane
Founder, Getfished
Scott's a software developer and the founder of Getfished. He's a long-time recreational angler focused on practical fishing forecasts, fishing report data, and decision-support tools for Victorian anglers.
He has a background in complex software systems and data analysis. Scott has a penchant for building software using low level tools, developing products like Getfished in C, Pascal, SQLITE and Hugo.